Showing posts with label mishima. Show all posts

Tuesday, May 12, 2015

more and more

more handbuilding and more decoration.... I got back to the Clay Spot a few days ago and had some fun with Helios, 
Yesterday I spent four hours decorating the pieces I made, and then another hour today, 
decorating is time intensive!
Along with the silkscreening that I usually add, I did a bit of mishima on most all of the pieces, 
the stechnique is not complicated.  First, you incise a line into leatherhard clay
then, paint underglaze or slip so that it fills in the line,
In the past, I've mixed a bit of white clay into the black underglaze to produce a charcoal color, but this time I went for the whole black
After it sets up a bit you need to remove the excess color, just leaving the part that fills in the line
you can sometimes scrape off some of the underglaze with a metal rib, and you can also use a damp sponge, dampening and wiping, and cleaning the sponge over and over to wipe off more of the streaks
I was working on five small dishes, six squarish plates about five inches wide and three darted cups
some have just mishima, and others have screenprinting as well
I painted the undersides today and added some slip decoretion, but forgot to take any photos,
I also made another eight cups today, so I need to decorate them tomorrow!   
I got a few things glazed that I made last time I was here in march, so it will be fun to see them come out of the kiln.  I've had a bit of trouble figuring out how thick to apply the glaze-- too thick and it looks cloudy over dark colored underglaze, and too thin leads to roughness on the rims.  Hope I get it right this time!


Friday, June 21, 2013

Flower brick

I was happy with the way the flower brick turned out. It is handbuilt with Slabs, and mishima decoration.

Thursday, January 24, 2013

Mishima

whether some of these are technically mishima, I don't know. 
Mishima is usually used to describe laying slip into incised lines in the clay.  Often I press lines into clay with stamps, especially carved wooden or rubber stamps.  Other times I draw into the clay with a somewhat blunt pencil. 
 here, the gray lines were made with bisque roller stamps, and the circle and flower design on the lower part of the pot is made with a flexible rubber stamp.
 Here the mishima is the red flowers.
 I often use it on edges
 I usually remove the extra color on top with a flexible metal rib, and a damp sponge. 

Monday, May 21, 2012

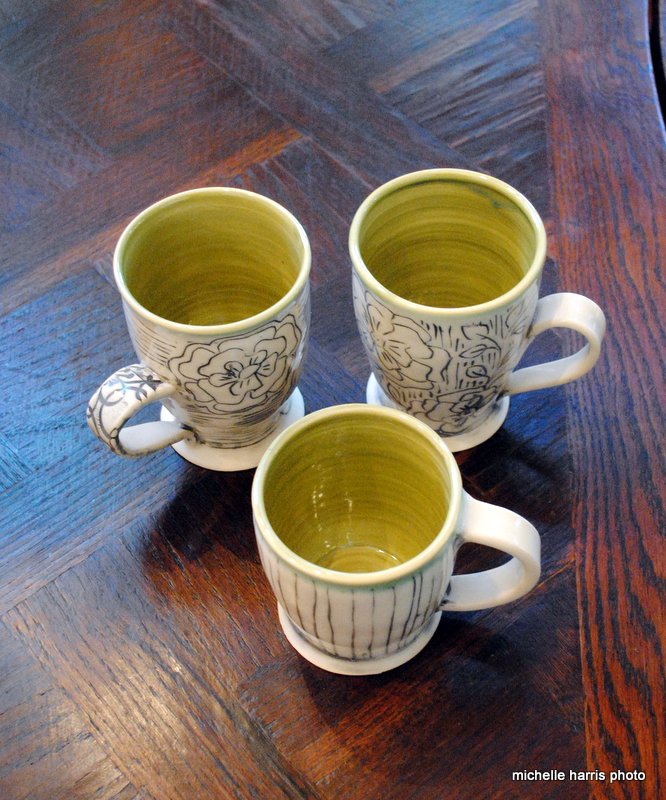
Mishima, glazed!

I went to the studio, and what a nice surprise to find Lisa had fired some of my pieces,
I was quite pleased with how the mishima mugs came out..
 I put "Jade Green" inside all of them, and then some I glazed the outside with clear glaze, and some got the green on the outside as well/

 The handles seem okay after all, although a bit on the larger side,
 The place where the glazes overlap make a nice variation of color,

 Not sure if I like the background with vertical lines, or horizontal.

Monday, May 7, 2012

Mishima in Progress

The inlaid "slip" that I used is really a mix of black and white underglaze, thinned down a bit.  I like the charcoal color better than a jet black.
The leaf-like patterned one in the center has the pattern from top to bottom, whereas the one to its left has a bit of empty space above and below the pattern.  I might put something in that area. 
i'm thinking that the inside of the mugs could have a green glaze, It would be fun to have a bright turquoise, but the studio doesn't have one that color, I don't think,
The flowery ones sort of remind me of molly Hatch ones,
On a couple of the mugs, I tried a technique that I saw on a video demonstration by Erin Furminsky, on Ceramicartsdaily
It has some slip trailed decoration that is quite raised.  Then there are layers of underglaze painted over it all.  Finally you scrape off the layers so that the slip trailing is exposed, and some of the layers of underglaze.  The underglaze had really gotten dry by the time I got back to do the scraping, so I ended up exposing some of the clay body as well, but we'll see how it all turns out.
 Finally for today, this is the butter dish that is hand-built that I made a few weeks ago.  As you can see, we have been using it, and it works pretty well!
 I like the base with it's slip wash, although the texture on the right side wasn't deep enough to hold on to it when I washed it away.  For one of my first hand built pieces, I'm quite happy with how it turned out!
Moon White clay, cone 6, clear satin glaze with glaze stain decoration.

Friday, May 4, 2012

Mug Shapes

 On Wednesday, I threw some mugs to explore some shapes, - I liked the posts on the Fine Mess blog about sketching in 3D, rather than on paper.  Although, I did make some sketches on paper first, but none of my mugs turned out to look much like the pencil sketches. 
I used a bit more clay than usual, it seems, because they all turned out a bit larger than I usually make.  I put the handles on yesterday.
I brought them home to work on a bit further because I wanted to do some mishima and needed to catch them at leather hard stage, and i won't be able to get to the studio for a few days by which time they would prob be too hard.  
1. Similar to what I've been making, but narrower at the top.  Also I think the handle is a bit too big
2.   again, big handle, ???
3. similar to #2,
4. shorter and wider , sort of like an old white glass mug
5. More rounded, with low handle, quite big!
6. much like #5, (they all seemed different when I was throwing them!)
7.  this one just looks upside down to me
8. the smallest of the lot, I added a couple of coils around the base.  very adventurous
9.  I sort of like this one, altho again, the hangle seems sort of large. 
 Why didn't I notice how big the handle wer while I was attaching them?
 Last night I did the "carving" for the mishima, and there were a lot of burrs, so I let them out overnight so that I could brush them off this morning and fill them in
which is what I'm going to do right now!