Showing posts with label pot shapes. Show all posts

Wednesday, September 12, 2012

Making some Progress,

I fired the bottom ring of my little, newly hooked up kiln yesterday! Yippee! 
 So, now I have a bit of bisque, including some test cylinders,
 Already the underglaze colors look brighter, so it will be exiting to see them with the glaze over top.  I have 2 glazes that I want to test, one from Lisa in Savannah, and one from the Digital Fire/Plainsman web-site. I went to Tree (the pottery supply place here in Saskatoon) and what a co-incidence, she had a test cylinder with the exact same glaze on it that I meant to test!!  (the frit that I requested is an odd one, and she had just got some of it in to mix up this same glaze) 

(the underside of some little dishes that I made some weeks ago)
So after seeing the sample of the glaze, I am super excited to try it myself!
 One of the things that I threw in my first bisque firing were these three flat shapes that I cut out to use as push molds for more little trays.  these will be a bit larger than the ones in the previous photo,, about 5" x 8" or so,
Of course I fired another load today.
I wonder if my little half-kiln would make it up to cone six before I get the new elements....

Saturday, August 25, 2012

Waiting in its various forms

 I have been hand-building and decorating more and more....
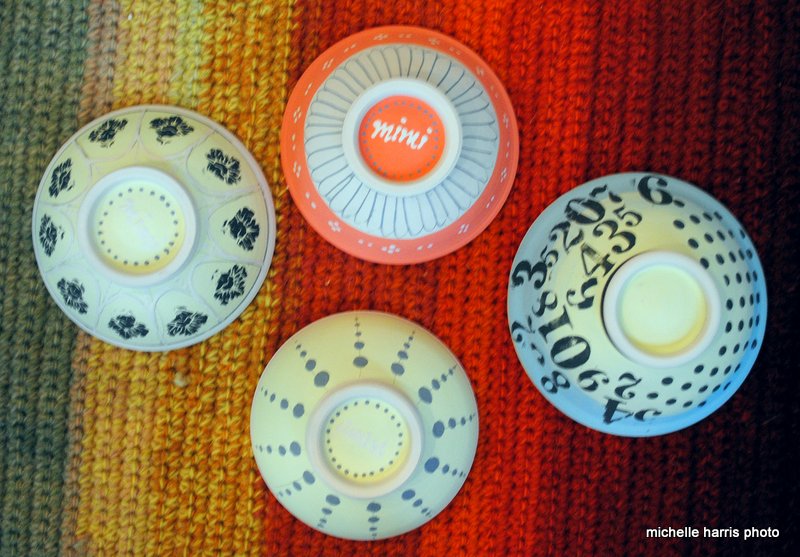
(bottoms of cups)
 partly this is because i continue to have some problems with my left hand, which might be carpal tunnel related.  But, the other reason is that I find it quite interesting. 
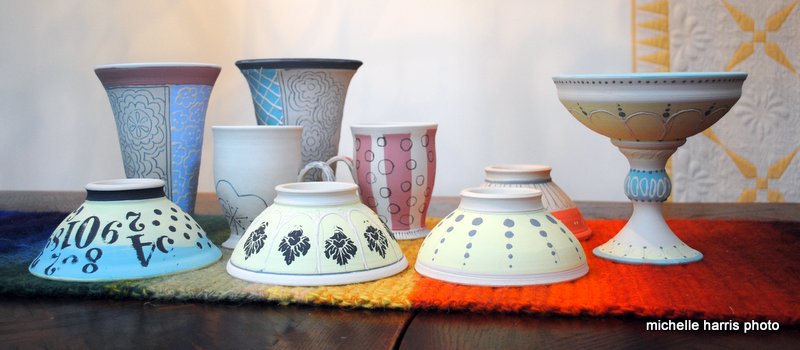
cups that are firming up before attaching the bases
In the past I made pots primarily by throwing on the wheel.  I find that handbuilding is quite a different experience: 
1. less wedging
2. different type of scraps
3. different shapes are possible
4. different rhythm to the work

 In particular, there is a different type of time-line involved.  In handbuilding, or more specifically, using slab construction, I find that there is a lot of waiting time between each step. 
I throw and roll out slabs, then wait for them to stiffen up before being able to cut shapes from them.
Some shapes are partially constructed, and then have to firm up more before continuing to work on them.  Even when the pot has been assembled, there is still quite a lot of fine-tuning to be done: lots of wiping down of rough edges, or scraping away with a rasp or a trimming tool, or smoothing with a smooth piece of wood or a rubber rib. 
 I also notice that it is quite a lot of fun to press designs into the slabs as I construct the pots.
 It's a form of mishima, I suppose, to paint the impressions with slip and then to wipe away the extra with a damp sponge,
 I've been using a dark grey slip up until this point. 
 On the vases,  I intend to add a colored glaze on the inside of the pot.  The mugs, I painted the insides with underglaze. 
I also am thinking of adding decals to some of them later, although I find it tricky to do long term planning like that.  It is easier for me to do as much to the pot at one time as possible to make it close to being finished.  It seems that there is too long of a gap between starting and finishing a pot to remember what I had planned.

 I am still doing a lot of underglaze decoration.  It too can be a waiting game.  I tend to apply three coats of underglaze to prevent it from looking streaky or translucent when glazed.  Each coat has to set up between applications.  So that means that I am working on several pots at the same time-- maybe 5 or 6.
 And, on another note, I am still waiting on firing all this stuff, since the electrician I found that is willing to come out here to hook up the plug won't be able to come until the second week of september.  : (
Yeah, that's quite a wait. 

 There will be hundreds of pieces by then.......

Monday, June 11, 2012

Potter from Corning, New York

Another potter who I met on our trip to Ithaca, New York, is Stacey Esslinger.
She, like Colleen McCall, who lives in Elmira not far from Ithaca, attended Alfred University for Ceramics.  She works in cone ten porcelain, which she rolls out into very thin slabs and textures with cloth patters pressed into the clay. 

Then she hand-builds these really lovely shapes using techniques you might associate with sewing garments: making darts, adding little "button" accents,


 The color palette here is in various shades of turquoise blues and lavender, but she also had pieces that were white with pink and lime green decorations,
 I like the texture of the high fired pure porcelain quite a lot.
On this cream and sugar set, the bottoms of the pieces are gently curved up on four sides,
 This is a little business card holder -- very practical!
 I was so lucky to meet her at the booth at the Ithaca festival! 

Sunday, June 10, 2012

Blue Rose Pottery from Poland

We drove up to New York last week from Savannah, and en route we stumbled over the warehouse outlet for a company called Blue Rose Pottery, in Fort Mill, South Carolina, just south of Charlotte,
It was quite an interesting place, full of lovely dishes.
This is their website, here
and these are the pieces that came home with me...
who doesn't need more pottery mugs?
 The painted decoration on these items is very clear and vivid
 they have a really wide variety of items, and several different lines of decoration
 This little tray reminded me of an old piece of English stoneware,
They really are a nice weight of stoneware, unlikely to chip.  They are definitely not the kind of "ceramic slip cast" stuff that is that white, porous stuff. 
The more I handle it, the more I like it.  These are definitely dishes that will last for years and years.
These images are from their website:
dessert bowl
cheese dish with mouse
egg cup set

Sunday, May 27, 2012

More decorating

I continue to decorate greenware,
 a couple of vases, mugs and bowls. Also a little footed bowl-- (they sure are hard to get on straight when you put the bowl on top of the base,)
I am really liking the combination of mishima next to the colored areas with slip trailing on the vases.

I'd like to get the vases a bit taller next time,
There is a bit of silk screen stencilling on the bowls,
 I've been making silk-screens, but have to get used to how to use them. 
 These things I decorated a week or so ago, and glazed them a few days ago.
Looking forward to seeing some fired work soon. 
A good thing about getting back to Saskatoon will be to get my kilns hooked up and my little studio working. 

Nb. Mitzi-- I left a mug for you on your shelf at the Clay Spot!

Wednesday, May 23, 2012

Patterns for Silk Screening

I want to use some generic type of imagery for silk-screening, that is, some really simple repetition of shapes, rather than figurative images.
I like dots, and so I  made some grids using little dot stickers.  They seem to come in colors and so I colored them black with a sharpie.
Then I stuck them down onto graph paper to make a grid.
 I made a few copies so that I could add other marks on to the grid:
 also made a grid where they are spaced a bit further apart.
 I also drew a sheet with just straight parallel lines, one with wavy lines, one with a square grid, and some with ovals.  I hope to burn some screens this week. 
 However, after using some of my first screens on clay this week, I find that it's sort of tricky to use them on curved surfaces.  I'm wondering about making some tiles.


Friday, May 4, 2012

Mug Shapes

 On Wednesday, I threw some mugs to explore some shapes, - I liked the posts on the Fine Mess blog about sketching in 3D, rather than on paper.  Although, I did make some sketches on paper first, but none of my mugs turned out to look much like the pencil sketches. 
I used a bit more clay than usual, it seems, because they all turned out a bit larger than I usually make.  I put the handles on yesterday.
I brought them home to work on a bit further because I wanted to do some mishima and needed to catch them at leather hard stage, and i won't be able to get to the studio for a few days by which time they would prob be too hard.  
1. Similar to what I've been making, but narrower at the top.  Also I think the handle is a bit too big
2.   again, big handle, ???
3. similar to #2,
4. shorter and wider , sort of like an old white glass mug
5. More rounded, with low handle, quite big!
6. much like #5, (they all seemed different when I was throwing them!)
7.  this one just looks upside down to me
8. the smallest of the lot, I added a couple of coils around the base.  very adventurous
9.  I sort of like this one, altho again, the hangle seems sort of large. 
 Why didn't I notice how big the handle wer while I was attaching them?
 Last night I did the "carving" for the mishima, and there were a lot of burrs, so I let them out overnight so that I could brush them off this morning and fill them in
which is what I'm going to do right now!


Saturday, April 28, 2012

"Mug Analysis"

-- being quite a blow by blow description of what went down on this first batch of mugs...

1.  my favorite at the moment, as you can tell from the coffee drip.  I like the color off this green, but there was some crawling.  I think because I used the black wash under the glaze, which could have acted like dust, and Lisa said that this is sort of a finicky glaze.

2.  Least favorite.  I don't like the great big leaf being so dark against the lightness of the flower.  Also, the flower could be outlined a bit more.  Also, the mugs look a lot better with a more pronounced foot "bump"

3. again, the carved drawing lines didn't pick up the black wash very well. 

4.  this looks a lot like a Mel Bolen mug to me.  On the positive side, the incised lines did pick up the black quite well, and there is also a nice halo of grey around the slip trailed dots!
same mug, shot of handle
5.  I like this mug, but the transparent glaze looks quite milky.  These were all on the bottom shelf of the kiln, so maybe it was cooler down there.  I wonder if I should re-fire them and see what happens
here you can see that the glaze is pretty stony down on the bottom edge.  Do you think that re-firing makes a piece warp more?
6.  The background of the main section on this one was rose underglaze.  Now it appears sort of grey,
7.  the turquoise blue seems pretty reliable.  Haven't got a clue what the color was on the top edge.
8.  light blue and grey , the decorative lines are pretty faint.
9.  This one is supposed to be orange.  again, the glaze is pretty milky,
where it was thinner on the top edge, you can see the color a bit better.  Re-fire? I sort of like this shape, and the bottom edge,
10.  Another one with this green glaze,  lots of crawling. These ones I brushed wax on the circles, and along the straight vertical edge, wiped away the dry clay to get the relief.  I really like this effect. 
11. Again, I really like the glaze trailed stuff.

12
and just for something different, a tile.  it had mishima where the black is.  I like the tree on the bottom right edge.  I think I might try it in slip trailing with charcoal grey slip.  
That's the initial round-up.  Feedback is welcomed.