Wednesday, October 17, 2012

A Little More Each Day

And it's Mud Colony time again! see what other potters are doing, here

Well now that my kiln is operational again, I've been firing it pretty steadily with the stuff I had been accumulating from making things all summer.  It's pretty exciting to see the colors come to life, and I can't stop feeling so happy about the success of the clear glaze.
Today was a gorgeous autumn day, so I was able to take some photos outside.
What I need to do is to try to analyze which colors work well together, what shapes I want to pursue,

two similar cups, with the same color combinations, although the mugs are different shapes, they are about the same size
tray, about 5" x 9", this sort of sagged in the middle,
I liked the way the greens interacted on the silk-screened part of this piece,
I like the buttery yellow background, and the rest is brushwork on this bowl  I might try to use this pattern again
close-up of a couple of layered screens.  I like using some basic shapes as backgrounds.  I also think that the dark brown underglaze is one of the most useful colors.
an artsy shot from above, of some of the little slab vases.  I really enjoyed making these shapes, plus they give a great surface for all sorts of decorative techniques
this shows just how luscious the glaze is. 
thrown mug, hand-built mug.  The glaze covers the rims of the thrown pieces really nicely, but some of the slab pieces are a bit rough on some edges.  I think I need to either smooth them more, or make sure that there is enough glaze on them.  This might also be that the glaze doesn't cover as thickly when there is underglaze on the rim.

handbuilt mug, I like the combo of colors
Maybe I need to make some sort of reference chart to refer to.  It seems that I'm always wanting to make charts...
 Maybe I could pull a lot of info together into a photo collage (or two or three)
four views of one mug. 
 Thanks for stopping by!

Friday, October 12, 2012

Notes on some Glazed stuff

Hello, If you arrived here from the Mud Colony site, thanks for the visit.  If you don't know what the Mud colony site is, you can go to it here.  it is a round-up of some other pottery blogs, and it is fun to see what others are up to each week.

I arrived back in Saskatoon on Tuesday, so I have switched back to the pottery that I do here, and left the clay that I was working on in Savannah there. 
In my absence Richard had picked up the new elements for the kiln, so I immediately installed them on Wednesday morning, and did their first firing as a bisque fire.  That went well, so yesterday I did a glaze firing. 
the unfired glaze makes them all look a uniform white,

It was nice to use the whole kiln, even though it is a little kiln. 
This morning I unloaded it, and these are some of my first impressions. 

the unloading of the kiln, minus the bowl that is stuck to a shelf.

the one on the left was fired earlier, up to a cone 5.  It seems that at the little bit higher temperature, the yellow is a bit less intense.

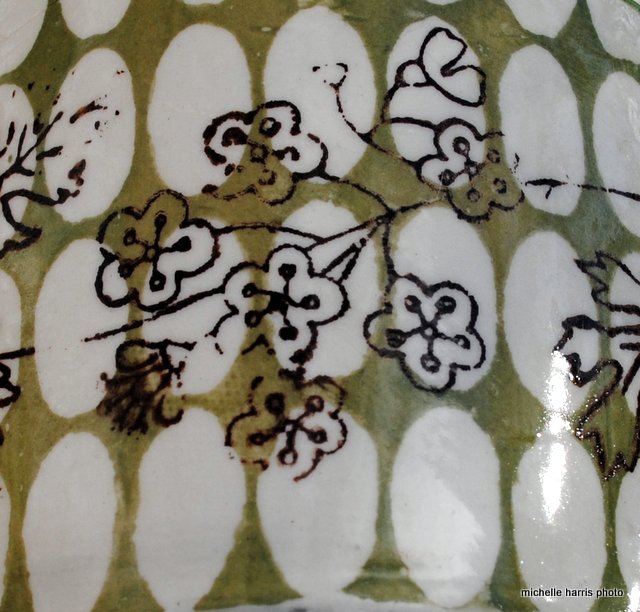
I like the little scene.  I find that this green turns into a muddy kind of green. I think it is the Amaco velvet underglaze, Leaf Green.  I hope to find a better green that stays a bit more cheery.
Handbuilt mugs.  On the whole, they seem all right.  I like the hollow handle on the cup in the foreground. 

A thrown mug.  The silk screening turned out well on the light blue background.  The pinky red is Amaco's Dark red velvet underglaze.  It is more of a dark pink.

The pinkish area on the mug on the left is the dark red underglaze lightened by adding a bit of white to it.  The one on the right is straight out of the jar.
I like the way this pattern turned out.  I must remember to use it again. 
 Well, those are the little memos to myself. 
I have another glaze load starting to warm as I write. 
On the whole, I'm pretty happy with the new clear glaze.  I had items in the firing where the glaze was applied quite thickly, and others where it was more on the thin side.  You can't really tell the difference, so that is good.  There is only a wee bit of pin-holing, although I tend to be pretty careful to check for that before putting the pots in the kiln, and wiping any air bubbles over. No crazing in sight, so it does seem to fit my clay body really well! Hurray! 
I read an article yesterday about how to take better photos, and so I will be trying to improve my set-up soon. 


Friday, October 5, 2012

A little analysis

I am linking up to the Mud colony site today, here
you can check out what other potters are doing, and it is fun to follow along from week to week. I hope that the link is working I'm still figuring out how to write posted using the iPad app.
This morning I spent a little while in analyzing elements of how to divide the surface up for decorating. It is my own idiosyncratic way of organizing my thoughts, which is by no means a complete reference.
I started with basic ways to divide a cylinder, then moved on to dividing a circle.
Having fun, I moved on to types of lines that I use, types of shapes, and different types of lines.
With all of that it is infinite in how these elements can be combined into patterns. I love pattern!
Maybe at some point I will take some reference photos of some of my favorite combinations of elements, or ones that I think were successful in some way.
In the mean time I have several small pieces that are waiting to be decorated today, so I am sure that my little charts will be useful as a starting point!
Hope you have fun visiting the other clay blogs, and if you arrived here via mudcolony, thanks for your visit, m

Wednesday, October 3, 2012

Judy Mooney Workshop

On Saturday I attended a workshop given by Judy Mooney called "Portraits in Clay", held at Savannah's Clay Spot. 
This is Judy during the workshop:
 She is a very good teacher!  Very well prepared, knowledgeable, calm and articulate.  At a comfortable pace, she guided us throughhow to develop a small relief sculpture of a head. 
 Mostly it was about the sequence of adding elements, and setting proportions.  We used a low fire raku clay body with lots of grog, I think so that it would dry well, since there would be a lot of uneven depths of clay.  The head is made from a solid lump, and then hollowed out later.
 She had prepared for each of us a gypsum board with proportions marked along the bottom edge. 
Above is my little 4 inch tall head placed on a backing slab of clay.

I wasn't sure whether to try hair or a scarf, and I think it looks like a cross between the two.  I was hoping it would look more like a scarf blowing in a breeze,

Looking at it from the bottom, you can see that it is pretty realistic in terms of how far the nose and chin and lips protrude,
 I am definitely going to try another one, but perhaps a bit larger, like 6 inches,
Judy recommended the books by Phillippe Faraut,
He is a gifted portrait sculpture in New York, whose website is found here
(Phillippe Faraut, photo from his web site)